How to add bleed and margins to your print documents to ensure they print correctly
At Creative Approach, we have a multitude of ways to get your work printed. You can e-mail your artwork, or upload it on our site – but you’ll notice that we (and all other print shops) ask you to include bleed in your documents.
This handy guide will help you truly understand what bleed is and how it works, and show you how to add it into your documents to get the right outcome in your finished product.
What is bleed in printing?
First of all, we need to understand what bleed is and why we add it.
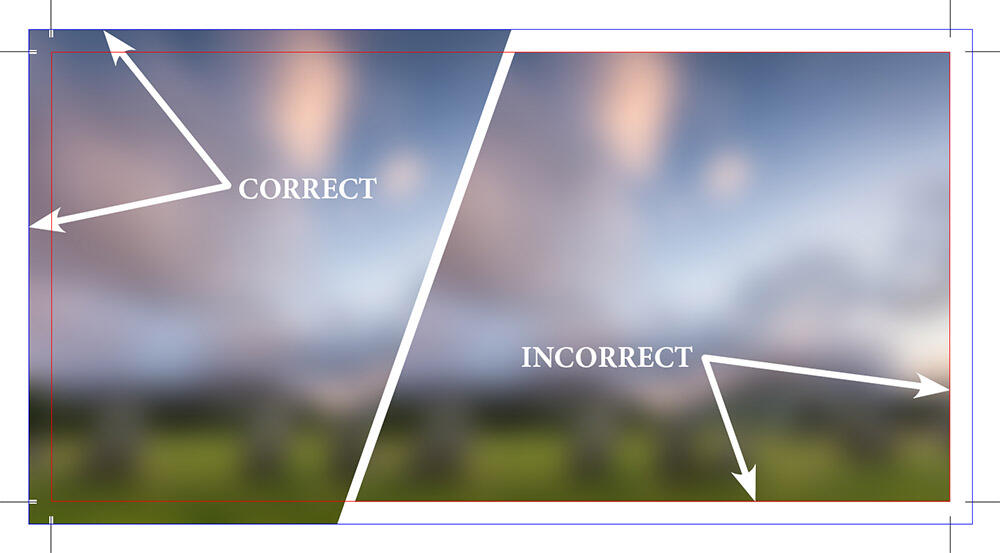
Bleed is the section of artwork that goes beyond where the paper is cut. When the paper goes through a printing press, and then through a guillotine, each piece of paper is different at a microscopic level. To ensure there is no white border at the edge of your artwork – which can look untidy and unprofessional – we recommend that you print images beyond where the cutting line is. This is so when the paper is cut – you get a nice clean cut-off point!
It’s also important to note that going too close to the edge can have the opposite effect and cut off things that you want to display. It’s always a good idea to have your artwork expand past the edge of your document, and leave plenty of space for cut-off, too.
This is not only good practical advice, but it’s also good design advice as well: having empty space in your design gives it some breathing room and makes it easier to absorb.
A standard US bleed is 0.125″, or one-eighth of an inch (or 3.175mm). We have some templates set up to help you [click here].
How do I add bleed?
There are many different ways and different programs to add bleed to your document, we’re going to cover the most popular ones below. If you’re still struggling then get in contact and one of our designers or project managers will gladly help you out.
Adobe, Microsoft, or Other?
https://helpx.adobe.com/indesign/how-to/set-print-bleed.html
Adobe Creative Cloud (or older versions: Creative Suite – a collection of programs that includes Photoshop, Illustrator, InDesign, Premiere Pro, and After Effects) has many applications. Photoshop is for photos, Illustrator for graphics, and InDesign for layout: we recommend using InDesign if you have it for the final layout of your document.
If you don’t have it – all our computers in our locations have the full Adobe Creative Cloud suite available to you for free!
If you’re using a different set of programs, we offer some guidance below – if you can’t find the help you need why not contact us for more details?
How to add bleed in Adobe InDesign
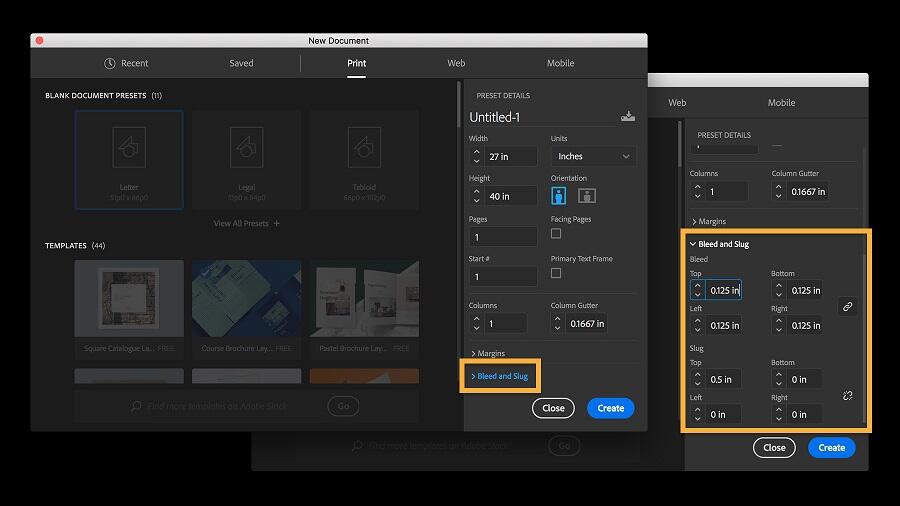
You can set up the bleed area when you create your document.
- Upon launching InDesign, click Create new.
- Select the Print tab at the top. In Preset Details, choose your preferred measurement units.
- Scroll, and then click Bleed and Slug to expand the panel.
- Type a bleed value in any unit. (You can type 0.125 in or 3 mm even if your document uses picas or something else).
- Set the same bleed on all sides, or click the chain icon to set different values for the top, bottom, inside, and outside settings.
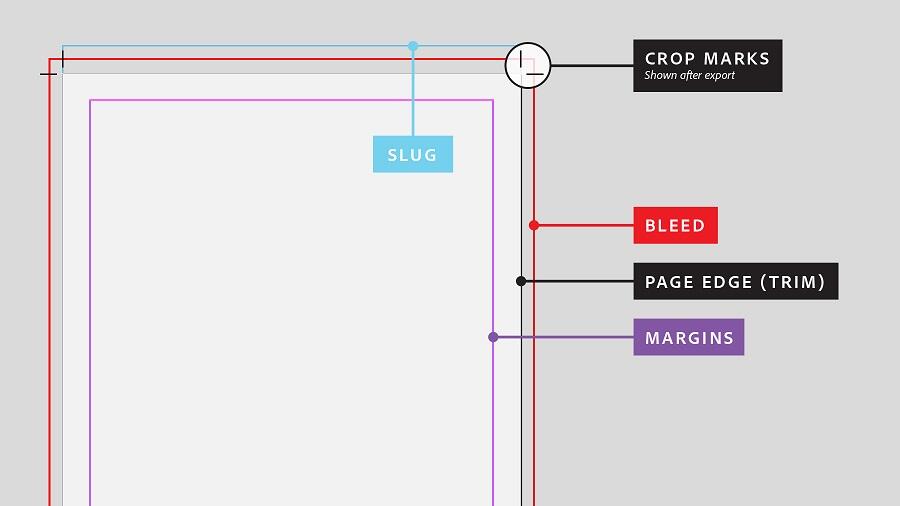
Now you will see a red line surrounding your document. Anything on the outside of this red line will be chopped off!
You can always add a bleed area to your document later, or edit bleed settings you entered previously. Choose File > Document Setup. Click Bleed and Slug to expand it, and then enter your values.
How to add bleed in Adobe Illustrator
https://helpx.adobe.com/illustrator/using/printers-marks-bleeds.html
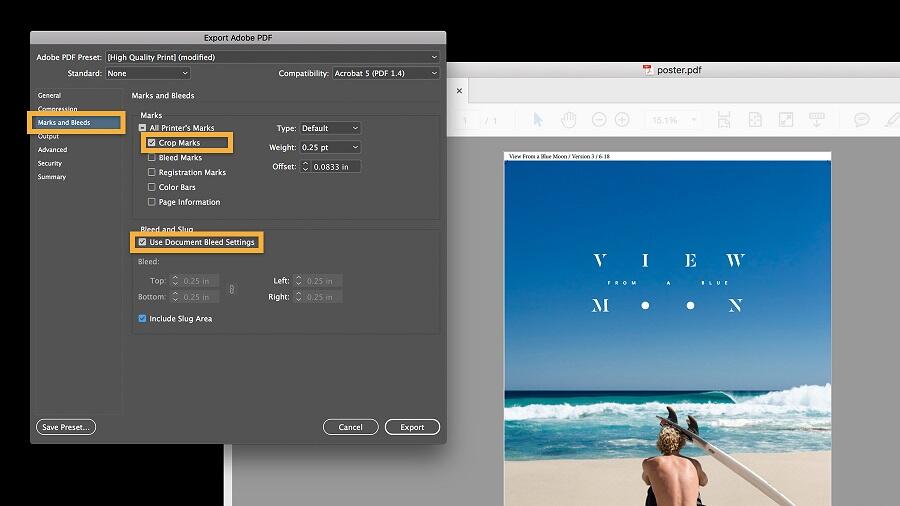
- Choose File > Print.
- Select Marks & Bleed on the left side of the Print dialog box.
- Select the kinds of printer’s marks you want to add.

How to add bleed in Adobe Acrobat (and Acrobat Pro)
- Choose Tools > Print Production > Add Printer Marks.
- Specify the pages to mark.
- Specify the marks and settings.
How to add bleed in Adobe Photoshop
Unfortunately, Photoshop does not have a function to do this. You can send us your artwork if you get stuck at this point – or import it into InDesign. Alternatively, you could make your artwork’s background a quarter inch bigger to allow for bleed.
How to add bleed in Microsoft Publisher
- Click File > Print
- Make sure “Print to PDF” or “Save to PDF” is selected.
- Click the menu to select a printer, and then click Advanced Output Settings.
- On the Marks and Bleeds tab, under Printer’s marks, select the Crop marks check box.
- Under Bleeds, select both Allow bleeds and Bleed marks.
How to add bleed in Canva
https://support.canva.com/publish/printing/crop-marks-and-bleed/
Canva is the popular web-based drag-and-drop client that allows you to create very basic designs, quickly. If you need something printed from Canva, be sure to follow these instructions:
- Create or open an existing design.
- Click File from the menu above the editor.
- Select Show print bleed. A border of broken lines will appear close to the edges of your design. This margin is fixed and cannot be adjusted.
- If you see white gaps around the design edges, resize or stretch your background to cover them.
How to add bleed in Procreate
Procreate is a popular app you can create designs on your phone. Unfortunately, Procreate does not offer the ability to add bleed. Instead, you can place your design in one of the options above, or send it to our project managers who can help you out. Alternatively, try making the base canvas size of the image a quarter-inch larger than it needs to be to accommodate bleed.
